The first step to convert a user into a customer is to ask him to add a product to the cart.
Natively in WooCommerce, you can add a product to the cart either from the single product page or from the shop page like adding a simple product to cart for example.

Sometimes it is needed to display a custom add to cart URL button on a featured product page where you have styled your product in an attractive way and would like to put the add to cart button at a custom area of your page.
In such a case, you can put the WooCommerce shortcode [add_to_cart] which is predefined by the WooCommerce team.
Sometimes it is not just enough to display the add to cart button. It becomes difficult when you have used a visual page builder or pricing tables to display your product or services.
You can create your own custom Add to Cart URL by the method I am going to explain you here.
As we all know that by using the default [add-to-cart] shortcode, the add to cart button displays and works well but in most of the cases, you may face styling issues due to any theme or plugin conflicts.
So, in such cases, you can create your own custom Add to Cart URL.
And trust me it is as easy as throwing a ball on the wall.
In order to create a custom Add to Cart URL, you need the product ID.
So, let’s go ahead and find out the product ID of whose we want to create the add to cart URL.
Go to your WordPress dashboard and hover on the Products tab.
Now, click on “All Products“.
Here, you can see the list of all the products that you currently have in your WooCommerce area.
To get the product ID, simply hover any product and you will see a little text like ID: 476 where “476” is the product ID of your product.

Now, it’s time to create a custom add to cart URL of this specific product and we will set it up as the URL of a button created with a visual page builder, elementor or with any other page builder.
So, you have to add /?add-to-cart=476 your website’s main domain where 476 is the product ID. So, replace it with your exact product ID.
For example, if your website is https://websoftglobal.com then the custom add to cart URL will be https://websoftglobal.com/?add-to-cart=476 (Replace websoftglobal.com with your own domain name).
So, when someone clicks on the button, the product with the ID 476 will be added to the cart.
What was good about this method?
Well, the answer is that rather than displaying or embedding the whole product on a specific page, you can simply create a custom add to cart URL button and display it anywhere on the website.
You can make pricing tables and display the custom add to cart URL button at the bottom to directly add a product to the cart rather than redirecting users to the single product page.
There are many reasons to create a custom add to cart URL in WooCommerce.
What about Variable Product? Can you create a custom add to cart URL for a variable product?
Yes, of course, it is possible but you need to add a few more steps to create a custom add to cart URL for a variable product.
Along with the URL, you need to include specific variation into it to add the product to the cart.
In order to work with variable product, simply go to the specific product and after selecting the variation value, you can hit the Add to Cart button and your product goes to the cart.
For example, if I have a variable product T-shirt with attributes Size, Color then I will select Size = Small and Color = Red and as per this selection, the price updates and I can add my product to the cart by clicking on Add to Cart button.
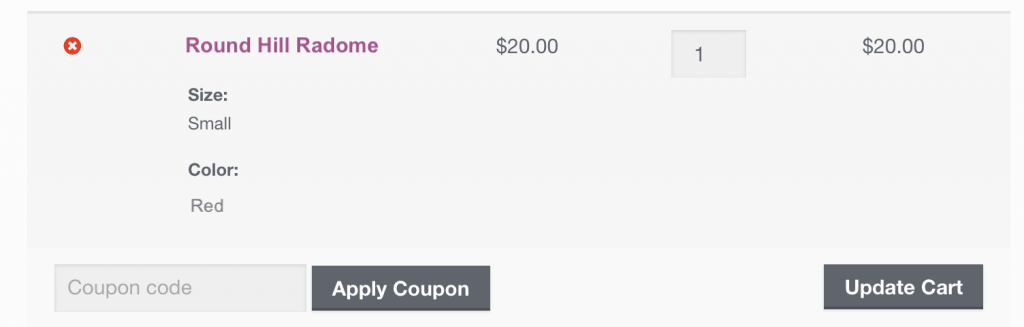
On the cart page, right click on the main product and select Copy Link Location or Copy Link Address.
Open notepad or any text editor and paste the link that you copied. You will have the link something like this:
https://websoftglobal.com/product/product-name/?attribute_size=Small&attribute_color=Red
Now, copy the entire part just after the “?” i.e. attribute_size=Small&attribute_color=Red
Its time to start building your own custom add to cart URL as you did before in the previous steps.
Likewise, for a simple product, you needed the product ID. In the same way, for a variable product, you need the product variation ID to specify which variation of the variable product can be added to the cart when customer hit the Add to Cart button.
To get the Variation ID, simply go to the WordPress admin area and then products. Now, open the specific variable product and jump to Variation tab.
Here, you can find the Variation ID of a specific product variation as shown below.
 In the above example, 786 is the product variation ID.
Now, as I asked you earlier to copy the complete link address of the variable product from the cart page. So, its time to make some basic changes to that link and your custom Add to Cart URL will be ready to use on any of the landing page or pricing tables.
Now, we need to add two statements to the link to make it work.
-
- ?add-to-cart=476
- &variation_id=786
So, the complete custom add to cart URL for a variable product in WooCommerce will look like this:
https://websoftglobal.com/?add-to-cart=123&variation_id=786&attribute_size=Small&attribute_color=Red
Replace 123 with the correct product ID and 786 with the variation ID of the specific product variation.
Now, you can use this link on any of the pages to create custom Add to Cart URL button in WooCommerce.
You might be interested in these articles too